2 Fun and Easy DIY Valentine’s Chalk Art Crafts to Melt the Stoniest Heart
by Word Rocks Project
I love Valentine’s Day gifts and décor with a personal touch, which is why I always pull out my liquid chalk markers when February comes around. Perhaps you’ve heard of hearts turning to stone? Forget that! Let me show you how to create V-Day chalk art so sweet and cute it can turn stones into hearts!
Heart Rocks

All you need to create these beautiful, personalized gifts are your chalk markers and some clean rocks. I find my rocks at the beach since I’m lucky enough to live close to the ocean. However, you can also find great rocks in the woods, a field, alongside the road or at your local landscape store if all else fails. I rinse the rocks in running water and let them dry before painting.
For this project, small (about 2 in. across) and smooth rocks are perfect. For these little rocks, I use fine tip VersaChalk markers in Valentine’s colors: pink, red and purple.
Step 1: Rough out the shape

I sketch out the shape of the heart with a very soft graphite pencil before using the marker. Pencils labeled 4B are ideal, and you can find them at an art supply store. Don’t worry about making a mistake because you can easily correct it with an eraser!
Step 2: Add the color

Trace over your outline carefully with the marker. Allow it to dry for a few minutes and then fill in the heart with color. If you need to make any corrections, allow the ink to dry completely first, then wipe away your mistake with a damp cloth.
Step 3: Personalize it!
Using your chalk markers or a permanent marker, add loving words, a personalized message or just fun doodles to make your heart rock one of a kind.
Step 4 (optional): Seal it
If you wish to make your design permanent, wait 24 hours and then coat the rock with a gloss finish acrylic spray.
Just like that, you are ready to spread some Valentine’s love!
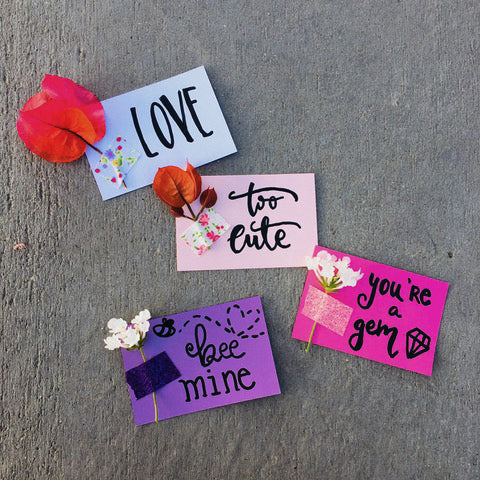
3D handmade flower cards

To make these heartwarming cards, you will need cardstock paper, preferably in Valentine’s colors like pink, red, white and purple. Cut the cardstock into 2 in. x 3 in. rectangles.
Step 1: Choose your message
Choose sweet and short quotes. You can make up your own cute V-Day message or find tons of great ideas on Pinterest and other arts and crafts websites.
Step 2: Make a draft

Write out the quotes on the cards with a very soft graphite pencil. Once again, I recommend a 4B pencil if you can find one. If you find it hard to keep your writing from slanting, use a ruler to draw guidelines to keep your letters straight and the same size. I actually prefer writing freehand to give my cards a more organic, natural look.
Step 3: Ink it in

Carefully trace over your quotes with a black, red, pink or purple fine tip liquid chalk marker. Allow the ink to dry completely before you erase any leftover pencil marks.
Step 4: Make it 3D with flowers

Pick some fresh flowers from your garden or choose some beautiful blooms at your local flower shop. Attach a single bloom to each of your Valentine’s Day quote cards with cute, decorative tape.
Now delight someone you love with your sweet and personal handmade card!
Spread the Love this Valentine’s Day
With these unique, fun and adorable chalk art crafts, you truly can melt even a heart of stone this V-Day. Get out there and melt your loved ones’ hearts with your one-of-a-kind DIY cards and gifts today!
Learn more about Word Rocks Project at https://www.instagram.com/wordrocksproject/.

