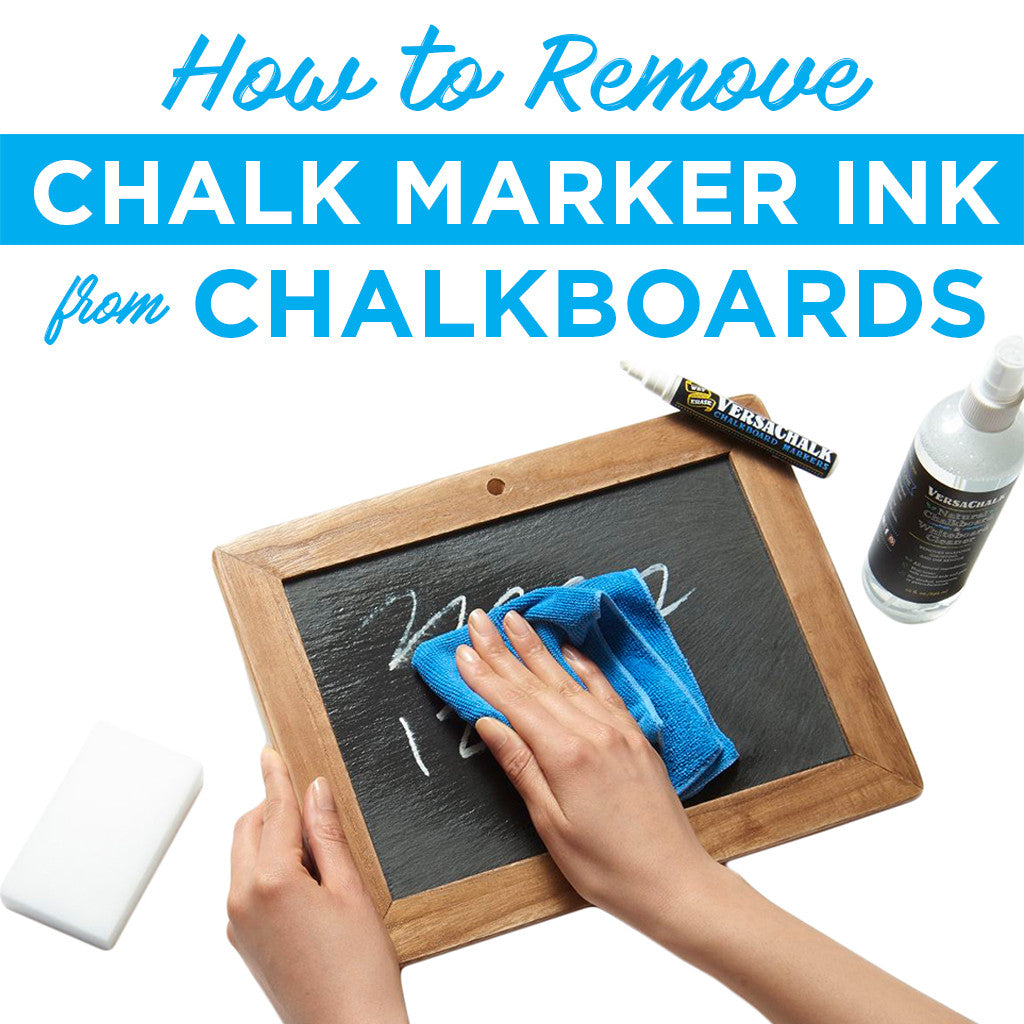
How to Best Remove Chalk Marker Ink From Chalkboards

How to Erase Chalk Markers Like a Pro
At one point or another, every chalk art enthusiast encounters problems erasing chalk marker ink from a chalkboard, chalkboard painted surfaces, chalkboard labels, contact paper, or other surfaces. One day, you are beaming with pride as you step back and admire your awesome DIY project; a week later, pride turns to heartbreak when you discover that your creation can’t be erased. Brilliantly colorful dreams give way to muddy, smudgy nightmares right before your eyes.
In this article, we’ll help you size up your chalk marker ink erasing problem, and answer any questions you may have about how to erase chalk markers easily. From prevention to solution, this guide has it all! But first…
What Is “Ghosting” of a Chalk Marker?
When chalk marker ink can’t be fully erased from a surface, it leaves traces—a “ghost”—of your previous artwork. This shadowy stain “haunts” any new piece you might create, driving you to ever-higher levels of frustration. But don’t lose hope, because there are ways to solve the problem and bring a happy ending to your chalk marker nightmare.
But before we go “ghostbusting,” let’s take a look at prevention, so you can avoid these problems altogether next time around.
Surface Matters: What Do “Porous” and “Non-Porous” Mean?
Check the label of any marker or glue bottle, and you’ll learn whether it is intended for use on porous or non-porous surfaces. Of course, that information won’t do you much good if, like most people, you are unfamiliar with those technical terms. Many people will say that if a surface feels hard to the touch it is probably non-porous, but there are so many exceptions to that rule that you’d end up more confused than ever.
A pore is a tiny opening in a surface. You have them on your own skin, and porous surfaces have them as well. Non-porous materials do not have these tiny pores, making them very smooth to the touch. (Your science-geek friend might claim that all surfaces are porous at the ultra-microscopic level, but the “pores” of a non-porous surface are so small that even the tiniest drop of ink can’t fit into them, which is what we care about here. So tell your friend to come back later.)
Here are some examples of common porous and non-porous surfaces.
Non-porous surfaces:
+ Glass+ Metal
+ Granite
+ Porcelain chalkboards (or other chalkboards labeled as non-porous)
+ Chalkboard contact paper
+ Vinyl labels
Porous surfaces:
+ Concrete+ Paper
+ Fabric
+ Wood
+ Chalkboard-painted MDF boards
+ Chalkboard-painted walls (unless the wall itself has a non-porous surface)
Why is the surface so important?
Chalk markers work best on non-porous surfaces like glass, metal, or non-porous chalkboards. Those tiny openings in porous surfaces like wood, paper, and so forth can trap any ink that seeps in. In almost all cases, this is what causes ghosting, and it explains why the problem is so maddeningly difficult to fix. The ink shadows aren’t on the surface, they’re in it! It is hard to erase what you can’t reach.
So by now, if the surface you’ve used is porous, you’re probably beginning to panic. Fear not, chalk marker ghostbusting help is on the way! Before we get to how to erase chalk markers most easily, however, we should say a little more about surfaces classified as “chalkboards.”
Be careful with chalkboards!
Yes, it sounds crazy, but not all chalkboards are compatible with chalk markers! As you can see from the above lists, there are many different types of chalkboards; some are porous, some are non-porous. We recommend asking your supplier which specific type of chalkboard they are selling.
The four most common types of chalkboards are:
- MDF wood coated with chalkboard paint. These are the low-quality chalkboards you can buy for $10. They are designed for use with traditional chalk and NOT with chalk markers. If you are going to use chalk markers, we recommend steering clear of this type of board. (If you’re curious, MDF stands for medium-density fiberboard, a special type of board created by pressing together many small wood particles. It’s great for building because of its strength, versatility, and environmental friendliness. We love MDF, just not for chalkboards!)
- Plastic (PVC or acrylic) chalkboards. This is the most common type of chalkboard available today. Good quality plastic/acrylic boards will erase pretty well, but some ghosting may still occur.
- Slate chalkboards. Slate is one of those exceptions we mentioned earlier: a non-porous surface that is rough and uneven to the touch. Slate chalkboards are used to create a rustic, vintage look. They should never ghost.
- Porcelain sheet chalkboards. These are high quality, heavy-duty chalkboards guaranteed to never ghost. They are highly recommended for home, commercial, and even industrial use.
What about chalkboard labels?
Vinyl chalkboard labels generally never ghost, but they can if proper care isn’t taken. Follow these helpful pointers:
- Don’t press too hard. Applying too much pressure as you write or draw can create a dent in the surface, which can trap ink just like pores do.
- Take a good look at the tip of the marker before you begin. The tips of some chalk markers are a bit rough at first. Try rubbing the marker on another surface first to soften and smooth out the tip.
Let’s Get Those Ghosts! Time to Start Erasing!!
No matter what surface you have used, with the right tools and a little patience, you can erase at least most of your chalk marker ink shadows once and for all. Let’s take on the biggest challenge first: how to erase chalk markers most easily from porous surfaces.
Erasing on porous surfaces
For chalk marker ink on porous surfaces, follow the steps below and keep working them. Although we cannot guarantee that all the ink can be removed, you should be able to erase enough to restore the surface to a usable condition. Your best tools here are a vinegar-based solution and a clean, soft cloth.Option 1: Vinegar + water
1. Combine vinegar and water. You can start with a fairly “watered down” mixture, and then increase the amount of vinegar with each attempt.2. Using the clean cloth, scrub as much ink off the surface as you can with the vinegar and water solution.
3. Leave the solution on the surface for 5 to 10 minutes. Do NOT wipe dry!
Scrub off the remaining ink and dry the surface.
Option 2: Vinegar + chalkboard cleaner
1. Combine vinegar with a chalkboard cleaner (see below for more information on these)2. Soak the affected surface in the solution, or sponge the solution onto the surface, for 3 to 5 minutes.
3. Scrub the ink away with a clean, damp cloth, and dry the surface.
Using cleaning solutions on porous surfaces
If all else fails, we recommend trying these cleaning solutions on ink-stained porous surfaces:
+ The Versachalk Whiteboard and Chalkboard Cleaning Kit+ Magic Eraser (Mr. Clean)
+ Ammonia-based cleaners, such as Formula 409
Erasing on chalkboards and non-porous surfaces
Erasing chalk marker ink on glass, metal, and non-porous chalkboards should be a breeze. First try simply wiping the surface with a clean, damp cloth. You can also soak the surface with water for 3 to 5 minutes before wiping to remove more stubborn ink.
If water isn’t enough (for example, if the ink has been on the surface for a very long time), the best approach to chalkboard cleaning is to use a chalkboard and whiteboard cleaning kit. Chalkboard cleaning kits usually include a spray solution, eraser, and microfiber cloth. Make sure that the cleaning solution is non-toxic and water-based so that your kids can use it safely, too!
In the rare case that these steps don’t quite do the job (which probably means your non-porous chalkboard is not so non-porous, after all), there are a number of other cleaners you can try.
Recommended Chalkboard Cleaners
+ The Versachalk Whiteboard and Chalkboard Cleaning Kit+ “Magic” erasers, such as the Mr. Clean Magic Eraser. The micro-scrubbers on these erasers are designed to take on tough stains. These erasers are considered safe to use, but they have been known to cause rashes. We do not recommend using them if you have sensitive skin, and advise against letting your kids use them.
+ Ammonia-based cleaners. This is the most common type of household cleaner. They are generally safe to use, but they are toxic to people and pets if not used properly.
Preventing the Problem in the Future
Now that you know how to erase chalk markers easily (or at least, as easily as the surface allows), you are probably pretty determined to prevent ghosting from ever happening again! Here are some final tips on how to keep your surfaces ghost-free.
+ Check if the surface you want to write on is compatible with chalk markers.+ Prime your chalkboards! Priming your chalkboards or chalk labels is the best way to prevent ghosting.
+ Always do a spot test!
+ Write on a small area of the surface.
+ Wait for the ink to dry.
+ Try to erase the ink using only a clean and damp cloth. If the surface is compatible with chalk markers, you should find that the ink erases easily.
Let Us Know Your Thoughts!
We hope this information helped! Now tell us: which method worked best for you?
